Monday, April 23, 2012

Fluffy Honey Butter

It's kind of hard to mess up honey butter. The basics are in the name--it's essentially honey and butter. And it is DEElicious!

What sets this recipe apart from the rest is the fluffy consistency. It will never separate like your run-of-the-mill honey butter. The powdered sugar also makes it a bit sweeter.

You'll have to drag out your mixer, but it will be so worth it! This honey butter will transform any dinner roll into something special. Try it! You'll like it a whole lot. 

Prom and Potatoes - How to Roast a Sweet Potato

Sweet potatoes are one of God's greatest gifts to mankind. It's a crying shame that most of us eat them but once a year—usually on the thanksgiving dinner table, in a casserole dish covered in cornflakes.

I first gave serious thought to sweet potatoes when Gradon and I were out to dinner with my parents at Outback Steakhouse. All four of us ordered the “Outback Special,” an amazing steak with two sides, one of which was a sweet potato. Several loaves of pumpernickel later, our main courses finally arrived, and I found myself enchanted by my potato. The vibrant orange hue was gorgeous! The skin was tender and the fleshy insides melted in my mouth, leaving a wonderful sweetness.
Weeks passed, and sweet potatoes left my mind until Gradon and I took a trip to Raleigh North Carolina and hit up the farmer's market there. Barrels of fresh sweet potatoes beckoned me, and I went ahead and bought a few, not knowing what I would do with them. After a little digging online, I found several tutorials on roasting sweet potatoes. I studied them all and came up with my own method.
I can honestly say that it was even BETTER than at Outback. Follow this recipe and you will be singing the praises of sweet potatoes before you know it.
The sweet potato is amazing because it requires absolutely no maintenance. All you need to do is scrub the dirt off, throw it on a pan and bake the heck out of it. It requires a lot of time to roast, but it seems that the longer it's in there, the better it becomes. The insides caramelize and turn delightfully sweet. They taste wonderful fresh out of the oven, plain and unadorned, but let's be honest—they taste even better with a scoop of butter (or honey butter!) and brown sugar.
The first time I made these, Gradon was in love at first bite. He looked up at me and said, “I may never eat a regular potato again.”
Preheat your oven to 450 degrees. Place sweet potatoes onto the rack above the baking sheet. That's right, no need to poke any holes. Bake for 20 minutes. After 20 minutes is up, decrease your baking temperature to 350 degrees. Bake or an additional 60 minutes.
If in doubt as to whether they are done, you can poke one with a knife—it should slide right through.
Allow the potatoes to cool slightly and then slice open with a knife to allow steam to escape. These babies will stay very hot for a long time if you don't slice them open. I've set them on the counter unopened for about 30 minutes before and they were still piping hot when I finally slit them open for serving. Top with a scoop of fluffy honey butter and/or brown sugar, if desired.
In other news, Gradon and I went to prom yesterday. Yes, prom.
I always feel a little jealous of married couples who were high school sweethearts—it's just too adorable to think that they share the same memories of silly high school stuff like late-night football games and prom. Are you one of those people? I like to think that college sweethearts are almost as cute, because that's when I met my husband. :)
So anyway, the V-Med Prom was last night and I got to get all dressed up in one of my fancy dresses from high school and dance the night away with my love. We had a lot of fun socializing with Gradon's classmates and enjoying the fun atmosphere of one of Charlottesville's cool downtown bars, Balkan Bistro & Bar. 

About an hour in, Grades and I got super hungry and walked next door to one of our favorite little Chinese Eateries. We just made it—they were closing in 10 minutes, so they cooked our food and we ate it on the front porch after they locked up. I think we made a bit of a spectacle out of ourselves all dressed up and sitting outside of a cheap Chinese Restaurant—we could tell that we caught the attention of a few cars as they passed. But it was so charming! It was drizzling and the night air felt crisp and cool. Plus the general tso chicken was to die for!
When our bellies were full, we made our way back to the bar and danced! About an hour later things got a little crazy with beer splashing all over the floor (and a little on my dress) so we called it a night. Gradon and I don't drink, so we tend to come early and leave early at those kinds of events. This one went from 9 to 2am, and we had church in the morning, so we left a bit before before midnight. I'm so glad that we went!

Sunday, April 15, 2012

Chocolate Mousse Crunch Cake

WARNING: This cake is ridiculous.

Rich, velvety mousse sandwiched between two giant slabs of chocolate cake smothered in toffee chunks and dripping with chocolate ganache. 

It's practically screaming for its premier at your next dinner party. It's an awesome celebration cake. Friends will go berserk. Love interests will propose marriage. 

They'll never ever know that it uses a (gasp) cake mix! And you won't have to spend all day slaving over a hot stove.

Let's make it, shall we?

Monday, April 9, 2012

Cinnamon Streusel French Toast Bake

Once upon a time I thought that all french toast bakes were created equally. Every single one I tried had been excellent. Then I tried a delightsome looking recipe called Peaches 'n Cream French Toast.

Sounds cute and yummy huh? Wrong.

I mean it was okay tasting, but the texture was all wrong. The bread was downright soggy. And overly eggy. And under baked, even though I baked the heck out of it! And I am a fan of under baked—believe you me. I've never been a crispy cookie kind of gal. But under baked does not do well in french toast form. It tastes blah.

For a while, I lost a little faith in baked french toast recipes, but I mustered the courage to try another, and wow! I'm glad I did.

This Cinnamon Streusel French Toast Bake is scrumptious and surprisingly simple! You can throw everything together the night before (including the streusel) and just pop it in the oven in the morning. Perfect for guests or weekends when you just need to eat something special. My family and I ate it for a lovely Easter brunch!

And if you've had an experience similar to mine with ooey gooey gross french toast, have no fear! You can cook this anywhere from 45 minutes to an hour depending on how crispy you want it. 45 minutes will be pretty soft (although not sickly soggy) and an hour will be well done.
    Cinnamon Streusel French Toast Bake
    Slightly adapted from Pioneer Woman 

    French Toast
    • 1 large round loaf crusty sourdough or french bread (I used 2 small ones)
    • 8 eggs
    • 2 cups whole milk
    • 1/2 cup heavy cream
    • 3/4 cups sugar
    • 2 tablespoons vanilla extract
    Topping
    • 1/2 cup firmly packed brown sugar
    • 1 teaspoon cinnamon
    • ¼ tsp nutmeg
    • 1/4 teaspoon salt
    • 1 stick cold butter, cut into pieces
    • 1/2 cup flour
    • Fresh fruit (optional, I used blueberries)
    Grease 9 x 13 baking pan with butter. Tear bread into chunks and evenly distribute in the pan. Mix together eggs, milk, cream, sugar, and vanilla. Pour evenly over bread. Then sprinkle it with fruit if you're using any. I loved it with blueberries!


     Cover tightly and store in the fridge several hours or overnight.

    In a separate bowl, mix flour, brown sugar, cinnamon, salt and nutmeg. Add butter pieces and use a pasty cutter to cut into the dry mixture until mixture resembles fine pebbles. If you don't have a pastry cutter, you should get one! They're cheap and super useful. But you can improvise and use a couple of forks to incorporate it as much as you can. Then store the little crumbles in a Ziploc bag in the fridge.


    When you're ready to bake the casserole, preheat oven to 350 degrees. Remove the casserole from the fridge and sprinkle crumb mixture over the top.


    Bake for 45 minutes for a softer texture and up to 1 hour or more for a firmer, crispier result. Scoop out portions on to a pretty plate and drizzle with warm maple syrup. Serve alongside french strawberries and raspberries, if you have them!


    What did you and your family do for Easter this year? Grades and I drove to Baltimore to spend it with my parents and my Grandma and Grandpa Lemoncelli. We attended two different church services where we heard a lot of beautiful music and wonderful lessons about our Savior Jesus Christ. Oh, and we ate an embarrassing amount of Momma-made peanut butter eggs. Among other delicious treats like sweet potato casserole, honey glazed ham, cheesy potatoes—the list goes on and on. Needless to say, Gradon and I are still sleeping it off.

    We also went to downtown Baltimore's Hippodrome Theatre to see a broadway show called Memphis! It was excellent! I still can't get all of the fabulous songs out of my head.

    Sunday, April 1, 2012

    Skillet Chicken Parmesan

    For the longest time I thought I didn't like chicken parmesan. I tried it a few times in restaurants and it just never struck my fancy. Something about the combination of pasta sauce and chicken didn't quite make sense to me. My taste buds must have matured, because now I love it! 

    The first time I made it, I was in love, and so was Gradon! He says my recipe is better than anything he's tasted in a restaurant. It's one of my favorite home-cooked meals because it's fast, incredibly flavorful and healthy too!

    I like to serve it over a bed of whole grain spaghetti or penne, but you really don't need pasta. Just pair it with some fresh broccoli or a green salad if you'd like!

    One serving is just 340 calories and 14 grams of fat. And it's all ready in about 30 minutes or so. Try this once and I guarantee it will become a go-to weeknight dinner that you can feel great about!

    Skillet Chicken Parmesan

    Nutritional Information: (1 Chicken Breast)

    Calories: 340 | Carbs 13g (Sugar 1g) | Total Fat: 14g (Sat Fat 6g) | Protein: 39g | WW Points: 7

    Ingredients:
    • 1/3 cup breadcrumbs
    • ½ cup grated parmesan cheese
    • ½ tsp dried oregano
    • ¼ tsp garlic salt
    • 1 large egg
    • 4 boneless, skinless chicken breast (about 1 lb)(If you have 2 large breasts, simply cut in half)
    • 1 tbsp olive oil
    • ¾ cup marinara sauce
    • ¾ cup low moisture, part skim mozzarella cheese, shredded (buy in a block and shred it yourself, i'm begging you!)
    Start out by shredding your mozzarella cheese. As mentioned in the ingredient list, please shred it yourself! I cannot stress enough how much better blocked cheese tastes and melts. Pre-shredded is okay in a pinch but is generally waxy and easily burnt. Try shredding it yourself once and you will never go back. It takes an extra minute and is infinitely worth it.

    In a shallow bowl, mix together the breadcrumbs, parmesan cheese, oregano and garlic salt. In another shallow bowl, beat the egg until frothy.

    Wrap the chicken breasts in plastic wrap and place on a cutting board. Pound each breast with a mallet/meat tenderizer to an even thickness (about ½ inch). Gradon always laughs when he sees me pounding chicken—it's a good way to get out your frustration!

    Dip each chicken breast into the beaten egg to coat, and then roll in the breadcrumb mixture.

    Heat the olive oil in a large nonstick skillet over medium-medium high heat. Add the chicken and cook for 4-5 minutes on each side, checking underneath the breasts after about 2 minutes to make sure they're not burning. Cook until well browned and just cooked through.

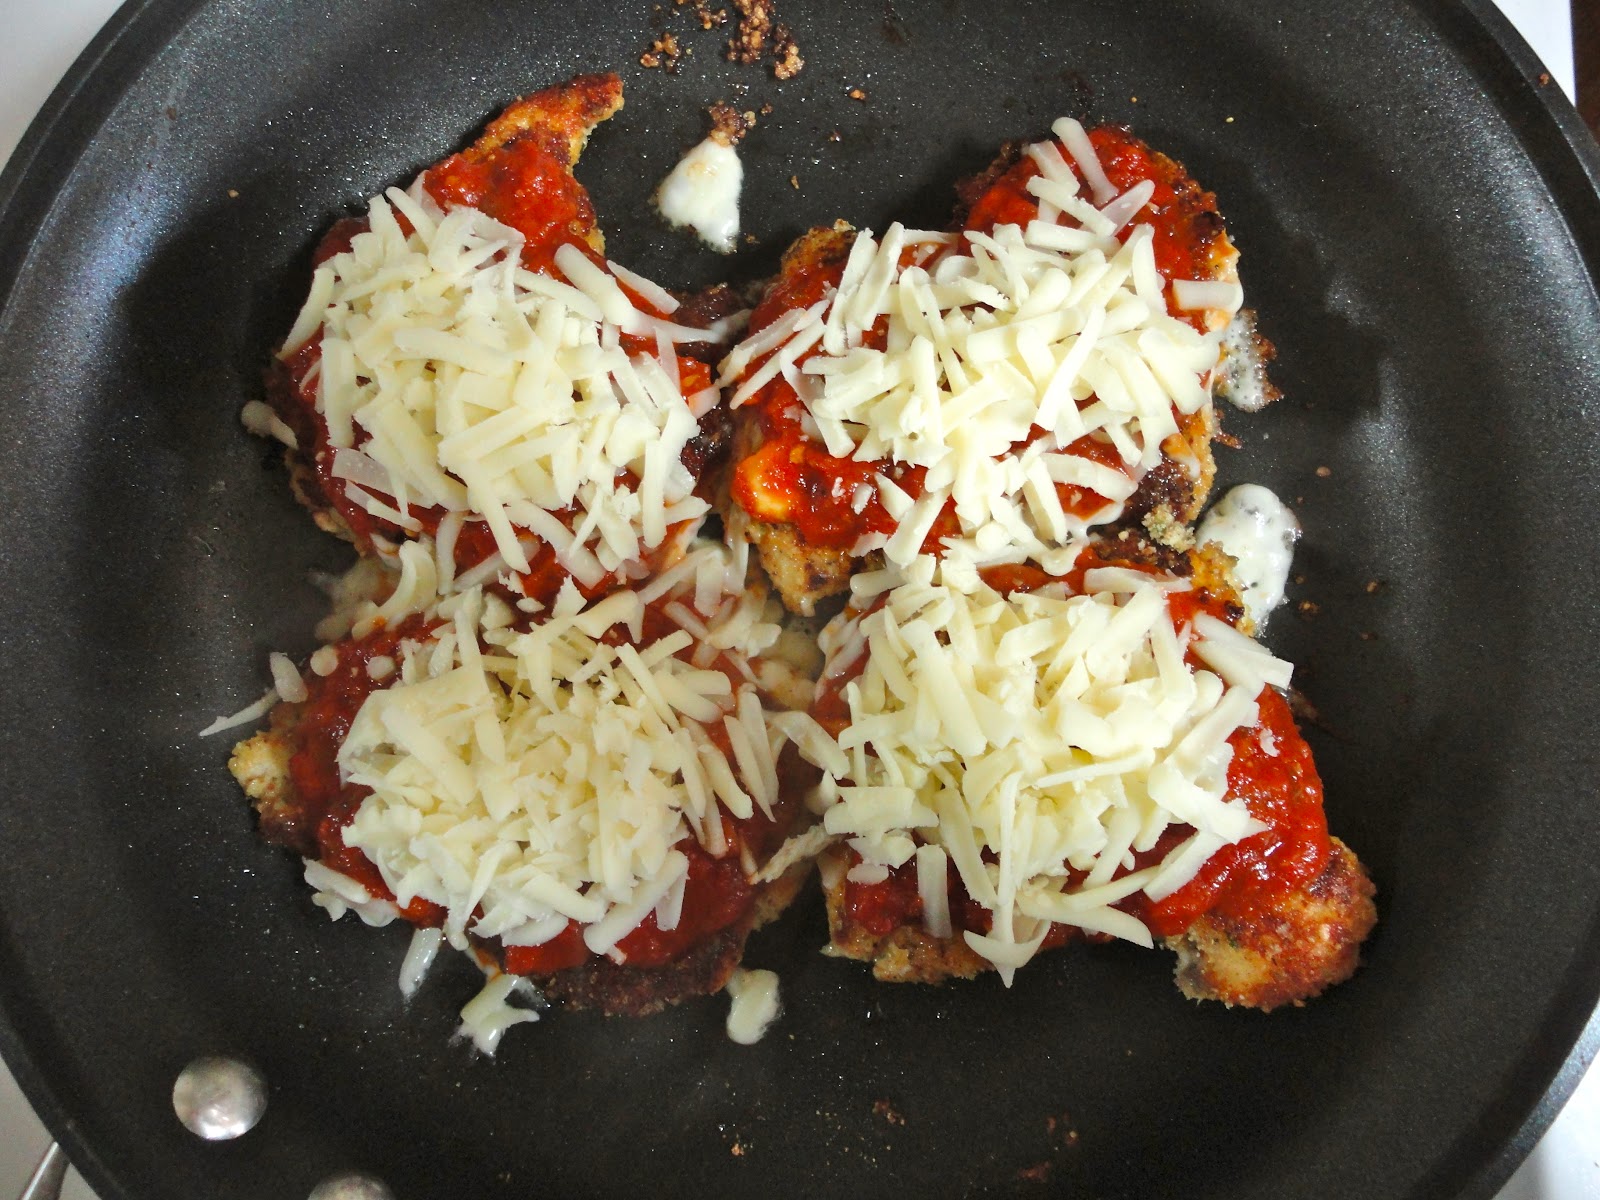
    Spoon an equal amount of marinara on top of each breast. Sprinkle with your lovely mozzarella cheese on top and cover the pan, reducing the heat to low. 
    Cook for about 3 more minutes, or until the cheese melts. Mmmmm cheesy goodness awaits you!