Monday, May 28, 2012

Cheesy Pastitsio

You like cheese, don't you?” I remember hearing Dr. Phil ask a very heavy woman this question on his show way back when I used to watch his show with my mom. That particular episode was on the obesity epidemic, and he had interviewed several people struggling with their weight. I remember thinking it was harsh to target one food like it was the root of this woman's problems.

If you love cheese as much as I do, rest assured you don't have to cut it out of your diet to maintain a healthy weight, especially if you use lower fat cheese, like the kind I use here. Just stay away from the fat free stuff, it doesn't melt well and honestly, it just ain’t natural for cheese to have no fat at all.
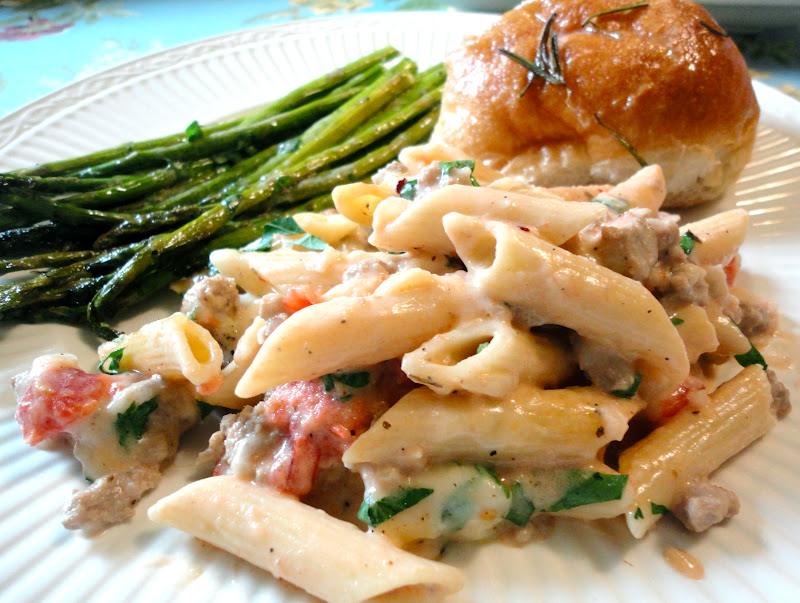
This pasta is reminiscent of alfredo, but has lots of yummy veggies tucked in the creaminess. The protein balances out the carbs wonderfully too! 
This recipe offers a hefty serving of 1 1/3 cup for just 355 calories and about 9.5 grams of fat. So go ahead, bask in all of that cheesy goodness guilt free!

Cheesy Pastitsio
Adapted from Eat Yourself Skinny!

Serves 6
Serving Size: 1 1/3 cups

Calories: 360
Fat: 9.5 g
Carbs: 39 g
Fiber: 4.8 g
Protein: 30 g
Old WW Points: 6.9 pts
New Points: 8 pts

Ingredients:
  • 8 oz. Uncooked Ronzini Smart Taste Pasta
  • 1 lb. 93% lean ground turkey (or beef)
  • 1/2 Tbsp olive oil
  • 1 medium yellow onion
  • 5 garlic cloves, minced
  • 3/4 tsp. salt
  • 2 cups skim milk
  • 1 (14.5 oz) can diced tomatoes, (I like the kind with Italian seasoning) drained
  • 6 oz fat free cream cheese
  • 3/4 cup (3 oz) shredded part skim mozzarella cheese
  • 2 Tbsp chopped fresh parsley
  
Cook pasta according to package directions and drain. Cut up your veggies and shred your cheese to prep.

Heat a large skillet over medium-high heat and coat pan with cooking spray. Add meat to pan and saute for about 5 minutes or until browned, breaking up large pieces with a spatula. Remove meat from pan and drain.

Wipe pan clean with paper towel before adding 1/2 tablespoon of oil to pan. Swirl to coat and then add onion, sauteing for about 4 minutes.

Add garlic and saute 1 minute, stirring constantly. Add meat and sprinkle with salt. 

 Stir in milk, tomatoes and cream cheese, stirring until smooth. Bring mixture to a simmer and cook 2 or 3 minutes more or until well heated. Stir in pasta to coat. 


Spoon pasta mixture into a 13 x 9 or 11 x 17 inch baking dish coated with cooking spray. Sprinkle mozzarella evenly over top and broil 4 minutes or until cheese melts. Sprinkle with parsley and dig in!

I served it with roasted asparagus and these rosemary rolls. Hope you enjoy! 

Tuesday, May 22, 2012

Roasted Tomato & Feta Scones

Most of the time that I crave bread, it's for cinnamon rolls, muffins and the like. But once in a while, it's for something savory. These scones are dense, garlicky and comforting.

The recipe requires 2 cups of flour, and I opted to use half white whole wheat. These scones are simple and bake up beautifully in no time! Bursting with feta, whole wheat flour, and roasted red tomatoes, these read as a bit artsy, which I love! For a classic, yet fabulous stick to your ribs breakfast scone, check out these Bacon Cheddar Cheese Scones!


Roasted Tomato & Feta Scones
Ingredients:
  • 2 cups flour (I used 1 cup white, 1 cup white whole wheat)
  • 1 tablespoon baking powder
  • 1/2 teaspoon garlic salt
  • 4 Tbsp cold unsalted butter, cut into cubes
  • 3/4 cup heavy cream
  • 1 egg, slightly beaten
  • 1 4 oz package feta cheese
  • 1/4 cup roasted red tomatoes, chopped (find them in the olive bar at your grocery store)
  • 2 green onions, chopped
    Preheat your oven to 400 degrees. Place the flour, baking powder, garlic salt and butter in a food processor. Make sure that the butter is good and cold! Pulsate everything in 3-second intervals until the mixture resembles coarse meal. (If you don't have a food processor, you can use a pastry blender or even two forks—but it'll take longer, of course)

    Transfer your mixture to a large bowl. Stir in heavy cream and egg, mixing the dough by hand until it comes together. Fold in feta cheese, roasted tomatoes, and green onions and gently mix until well combined. 

    Sprinkle some flour on your surface and form a big dough ball. Flatten the dough into a 1 inch disk and cut it in 8 equal pieces with a pizza cutter or a large knife. 

    Bake for about 15 minutes on a baking stone or a baking sheet lined with parchment paper. Remove scones from baking sheet and cool on a wire rack—or eat them right off the stone!

Friday, May 18, 2012

Apple Turkey Picadillo

This is a delightfully spicy and healthful Latin American dish that you can feel good about eating! It's an interesting blend of flavors that I have grown to love. The sweet and slightly tart granny smith apples pair well with the meaty turkey and juicy tomato.

Serve it over brown rice or tucked in a tortilla as a burrito filling. I also tossed together a little salad with sugar snap peas and balsamic vinaigrette to go with it. It's reasonably fast—takes me about 40 minutes start to finish—so I like to make it on weeknights. I hope it makes it into your rotation! 


Apple Turkey Picadillo
Adapted from Eating Well
Serves 4 (1 1/4 cup each)

Nutrition Info: 246 calories; 8 g fat; 45 mg cholesterol; 17 g carbohydrates; 0 g added sugars; 30 g protein; 4 g fiber; 488 mg sodium

Ingredients:
  •  4 teaspoons extra-virgin olive oil
  • 2/3 cup finely chopped red onion
  • 2 cloves garlic, minced
  • 16 ounces 99%-lean ground turkey
  • 1 teaspoon ground cumin
  • 1 teaspoon dried oregano
  • 1/2 teaspoon salt
  • 1/2 teaspoon freshly ground pepper
  • 1/4 teaspoon ground cloves
  • 2 tablespoons apple cider vinegar
  • 2 medium granny smith apples
  • 2 cups chopped tomato
  • 1 teaspoon Worcestershire sauce
  • 1/4 cup sliced green onion

     
  • Chop your fruits and veggies first. Once the cooking starts, it goes pretty fast! Then heat olive oil in a large skillet over low-medium heat. Add onion and garlic, stirring often, about 2 minutes. 
    Add turkey and cook, stirring and breaking up with a spatula until lightly browned, for 5 to 7 minutes. It will still appear pale for now but will brown up nicely later.
    Then spice it up! Add the cumin, oregano, salt, pepper and cloves, cooking for 30 seconds. Stir in vinegar, scraping up any browned bits that you see. Next, stir in apple, tomato and Worcestershire sauce. 

  • Reduce heat to low and gently simmer, stirring often, until the liquid in the the pan has reduced to a syrupy glaze, about 8 minutes.
    Top with a handful of green onions and serve. (The hubby likes to go light on the green onion, but I pile mine on!)

  • Sometimes I feel like Grades and I are so wrapped up in our routine of work and school that I start itching to do something spontaneous. So last Thursday, we went to a Dierks Bentley and Eli Young Band concert! We totally partied on a weeknight! And it was fabulous. 
    I had been mulling over whether to splurge and spend around $85 for the two of us for a couple of days when I had a moment of genius. I checked Craigslist and sure enough, two $25 lawn tickets were waiting for me the morning of. I scarfed them up quickly and Grades and I spent the better part of the evening curled up in a blanket listening to some of our favorite songs. Dierks definitely had us on our feet a few times though! I couldn't believe how energetic he was on stage. It was amazing that he could catch his breath enough to sing so well. He truly sounded incredible.  


Monday, May 14, 2012

Rosemary Rolls in an Iron Skillet

I'm all for homemade rolls. I absolutely cherish them. But some days I just don't feel like waiting around for yeast to work its wonders and then go through a million steps. Not that it's not worth it—homemade rolls are always worth it! But these are my go-tos in a pinch! I'm always getting compliments on them—no one ever guesses that they're from frozen dough! That's the magic of fresh herbs and butter baby. 

I recommend Rhodes rolls. I first discovered their greatness while living in Utah where they are plentiful. I was so excited to see that they have one variety here in Cville! If you can find them, get the big Texas style ones, but I use the regular kind here.

You will need an iron skillet. I love presenting them this way—it always brings a rustic homestyle feel to the table. And some oohs and ahhs from guests! 


These rolls are flavorful and smell awesome. I love that they're versatile enough to go with pretty much any meal.

Just remember to give yourself enough time to let the rolls rise. You need 3 ½ to 4 hours, start to finish. I like to let them rise a good long time, at least 3 hours. 

Rosemary Rolls in an Iron Skillet
Adapted from Pioneer Woman
Makes: 9 rolls

Ingredients:
  • Frozen dinner rolls (Rhodes rolls, if you can find them)
  • 2-4 Tbsp salted butter, melted
  • Fresh rosemary, chopped
  • Sea salt
Start by spraying your iron skillet with cooking spray. Place frozen rolls a decent distance apart to give them enough room to rise. You want them to be cozy without suffocating eachother. I did 9 to a pan. I wouldn't recommend more than that.


Then cover it with a clean towel or plastic wrap sprayed with cooking spray so it doesn't stick to the rolls. Place in a warm(ish) place if possible. Rolls need to be warm and happy if you want the yeast to jump for joy!

Then walk away for a good three hours or more. Check on them after an hour or so, and if you don't see much progress, try this: Set your oven to 200 degrees and let it heat up for a minute. Then turn it off and stick your rolls inside. It should be warm, but not hot enough to cook your rolls. Keep them in there for the remainder of their rising time. That will definitely do the trick!

And soon enough, they will look like theees! I love this stage. They're so dang cute.

At this point, melt a little butter (2-4 tablespoons) and melt it in the microwave. Baste your rolls very lightly (you don't want to crush the poor dears!) They're very delicate.

Then grab your fresh rosemary. Unfortunately I don't have an herb garden so I'm one of those suckers who pays $2 a pop for fresh herbs at the grocery store. Don't be like me.


Cut up the rosemary and sprinkle on top. Then top it with a few sprinkles of sea salt! I know you're skeptical, but a little bit of salt mixed with the rosemary makes magic.


Now pop them in the oven at 350 degrees and let them cook for 18-25 minutes, depending on your oven. Watch them closely, but be sure to get them a nice golden brown—that way you'll know the bottom is cooked.

When this is achieved, grab a hot pad and pull them out of the oven. Give them once last little brush of melted butter and serve!


Friday, May 4, 2012

Bruschetta

 I spent the last three hours monogramming cake pops. Can you believe it? Three hours. I've been selling cake balls and pops for special events here and there and it has been really fun! People just seem to fall in love with the little gems.

So since i've been ummm....sampling some of the ones that didn't turn out quite right, I started feeling a bit overloaded with sugar and started craving something fresh and flavorful. I just wanted a few bites of something savory, and bruschetta was just the ticket!

I surfed all over the blogosphere to evaluate different methods of making bruschetta, and I believe I found the perfect one! Although I understand that traditional old country, the way your italian grandmother used to make it bruschetta is typically drizzled with olive oil and lightly toasted in the oven, somehow that method just wasn't doing it for me. I wanted something a little more indulgent, without going over the top. 
And Pioneer Woman came to my rescue as usual. This bruschetta, my friends, is oh so special for a few reasons. One, because it uses multicolored cherry tomatoes, which makes it not only beautiful, but bursting with flavor. Two, because it's topped with fresh basil, and fresh basil always tastes like gourmet pizza. And three, because it's grilled on the stovetop in butter. The grilling brings it all to life. 

Bruschetta makes for an awesome appetizer to an italian dinner of pizza, pasta and/or salad. It adds beautiful color to the table. It's also great for a simple snack or party food.

So skip on down to your country store and find yourself some ripe red and orange cherry or grape tomatoes and get cracking! 

Bruschetta
Adapted from Pioneer Woman

Ingredients:
  • 2 tablespoons olive oil
  • 5 cloves garlic, finely minced
  • 1 pint red grape tomatoes, halved
  • 1 pint yellow grape tomatoes, halved
  • 1 tablespoon balsamic vinegar
  • 16 whole basil leaves (chiffonade)
  • Salt And pepper
  • 1 whole baguette
  • 6-8 tablespoons butter
Slice tomatoes in half. Chop up your garlic.

Heat olive oil in a small skillet over low-medium heat and throw in your garlic. Toss it around with a spoon for about a minute, careful not to let it burn. Then pour it into a bowl (with oil oil) and let it cool for a few minutes. 

Meanwhile, roll up your basil tightly and slice it into strips. Or cut them with a scissors like me.

Next, put your tomatoes in a bowl and add your balsamic, basil, and a little salt and pepper. 

Stir it up and taste it. Add more of whatever you think it may need. I always seem to want to add more salt. It's a problem I have! Then, if you can, let it sit for an hour or two in the fridge to help the flavors mingle and maybe even start a few relationships.

When you're ready, grab your baguette and cut with a serrated knife at a diagonal to form pretty slices.

Melt butter in a pan over medium heat and add bread slices, in batches if needed. Toast for about 2-4 minutes on each side (check them after a bit to prevent burning) until golden and buttery. 

To serve, place baguette slices on a cake plate or serving platter and heap on your tomato mixture. Mmmm so pretty! I'm just loving the natural beauty of vegetables these days. 
 
Speaking of italian food, I ate this amazing tortellini-like concoction at the Virginian, one of the oldest restaurants in Charlottesville, for date night this past Friday. I found Gradon's dish quite uninspired in comparison to mine, but he loved it nonetheless! I guess he makes it a point to enjoy his greasy buffalo chicken burgers when he can, since I don't tend to make such things at home. 
 
Then we headed off to an art gallery to marvel at some pretty awesome altarpieces. We finished off the evening with a stroll around the ever-beautiful UVA campus, brushing up on some Charlottesville history along the way. Turns out, the Rotunda was a make-shift hospital during the civil war. Must have been the prettiest hospital in the world at the time!