Friday, July 13, 2012

Balsamic Roasted Red Potatoes

Gradon has a love affair with balsamic vinegar. I remember him taking me out to a nice italian restaurant back when we were dating and the waiter brought out some beautiful foccacia bread along with a little dish for oil and balsamic vinegar.

Where I come from, we go heavier on the oil, with a few drops of balsamic for flavor. But Gradon proceeded to flood the dish with vinegar until it was black. I remember watching him dunk that dense chunk of bread with pure balsamic vinegar—utterly drenching it. It really threw me for loop watching him down the bread like that.

The great thing about these potatoes is that they have enough balsamic vinegar to pack a punch, without overwhelming the palate. They're smothered in an array of spices as well as onion and garlic. 

These potatoes make for a delicious and pretty side dish. The edges crisp up and deliver a wonderful flavor. They taste fantastic and you will love them!


Balsamic Roasted Red Potatoes
Adapted from The Baking Beauties

Ingredients:
  • 2 tablespoons olive oil
  • 2 pounds small red potatoes, cut into eighths
  • 1 tablespoon yellow onion
  • 6 garlic cloves, minced
  • 1 teaspoon dried thyme
  • 1 teaspoon dried rosemary, crushed
  • 1/8 teaspoon ground nutmeg
  • 1/4 cup balsamic vinegar
  • 3/4 teaspoon seasoned salt (or garlic salt)
  • 1/4 teaspoon pepper
In a large nonstick skillet, heat oil over medium heat. Add the potatoes, onion and garlic. Toss to combine. Add the thyme and rosemary, crushing it between your fingers to release the flavor. Add the nutmeg and toss well. Cook, stirring for 3-4 minutes or until potatoes are hot and getting browned a bit. They will also start to smell divine!

Transfer to a baking pan coated with your misto or nonstick cooking spray. I drizzled about ½ to 1 tbsp of olive oil on the baking pan for good measure. Bake your little beauties at 400 degrees F for 25-30 minutes or until potatoes are crisping and almost tender. Take them out of the oven and set them on the stove top for a moment, pouring the vinegar as evenly as you can over the potatoes. Add the salt and pepper, tossing well. Bake an additional 5-8 minutes until tender. 

Happy Birthday to America this month! We feel so blessed to live in this great country and have the freedoms that we enjoy. Grades and I felt extra patriotic this year in spending the 4th in Charlottesville, the home of the man who wrote the Declaration of Independence. Cville residents love their TJ. 

It was so nice to have Wednesday off because Friday came so quickly! We spent a good chunk of it at the downtown mall, eating at Eppie's, tossing around a beach ball, fanning ourselves for relief from the oppressive heat, and enjoying all of the live music. See that guy playing the guitar, the harmonica, a drum AND tinkling a little tambourine with his foot? I was mesmerized. 


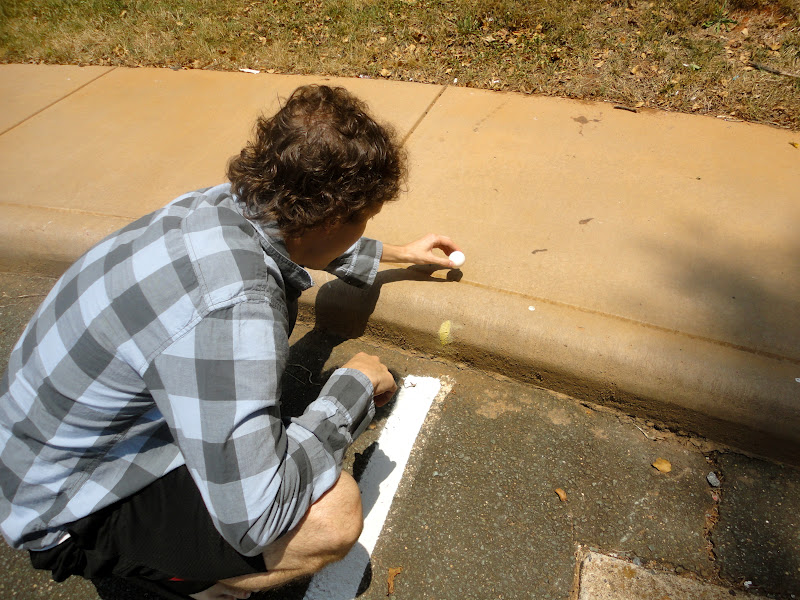
Other events of note this month include our attempt to fry an egg on the pavement. We've had some gnarly weather around here. Up in the 100s. So we figured it was a good time for that experiment. I don't know what we expected...a little sizzling perhaps? We waited for a few minutes with no change and said we'd check on it later. By that time, it had been run over by a car. 


Monday, July 2, 2012

Cheesy Chicken Ranch Panini

What do you do when all you have left in your fridge is some leftover meat, regular sandwich bread, a couple of chunks of random cheese, perhaps a few slivers of vegetables and some crusty condiment bottles?

You make a panini my friends! You know, the special fancy kind that you pay the big bucks for at Panera Bread. Only i'm willing to bet that yours will be even better! You can get super creative with paninis, so I'll just cover the basics here. I've been making a bunch for Lover lately on nights when I've been a little too lazy to make real dinner, and they have been very well received!

Here's one of my creations that came out particularly well. Grades LOVES ranch dressing more than any other condiment on the face of the earth, so this concoction served him quite well. 

Cheesy Chicken Ranch Panini

Ingredients
  • 2 pieces sandwich bread (I had whole wheat on hand)
  • 2 tablespoons butter, softened
  • 1 fairly thin chicken breast (cut in half, if needed)
  • dijon mustard
  • ranch dressing
  • sharp cheddar cheese
  • Monterey jack cheese
  • bacon and/or sausage (optional)
  • half-handful of red onion, sliced
Start by shredding the cheese by hand. Buy the nice blocks at the grocery store because they melt well! Not like the plasticky pre-shredded stuff. If you want, you can just cut the blocks into thin slices and it will turn out dandy. 

Sprinkle a thin piece of raw chicken with salt and pepper and fry it up with some butter in a skillet over medium heat until done. (If you have a huge breast on your hands, slice it in half before cooking) Slice it into strips and set aside. While you're at it, throw a half-handful of red onion slices in there and saute for a minute or so. 

I also fried up a little leftover sausage because I had it on hand. I imagine that crispy bacon would have made it even better! By all means, if you have any, throw it in the pan. Then set it aside for later.  


Take two pieces of bread and butter them generously. (soften your butter slightly in the micro, if needed) Then flip them over and coat them well with dijon mustard on one piece and ranch on the other. Don't be shy! Coat it on thick because it will turn into a dreamy sauce when heated. 

Place the bread slices buttered-side-down in a pan over low-medium heat. Pile on your chicken, (bacon and/or sausage, if using) cheese, and onions on one piece of bread. 


Top with other slice of bread and press it firmly with the top of a small saucepan. (Or use your handy panini maker if you're fortunate enough to possess one) Don't be afraid to squash it—that will help the flavors meld together. Then let it sit with the top covering it for a few minutes. (Check it after a bit to be sure the bread isn't burning.) 

When the bread browns nicely, flip it over and squash it again. You may need to add a little more butter to the pan. Keep the panini covered because it will help the cheese to melt faster. Let it cook for a few minutes on the other side, until browned. 

Cut in halves and serve with fresh fruit or whatever else your heart may desire!

Grades and I recently embarked on our first hike of the summer season! We climbed Humpback Rock, a favorite spot for the Cville locals. Let me tell you, although it was a short hike, we were sweating like pigs. It was harder than we thought! But the difficulty proved well worth it when we saw the magnificent view.


Saturday, June 23, 2012

Oatmeal Chocolate Chip Cookie Pancakes

Pancakes are weekend food. Typically reserved for Saturday and Sunday mornings. But every once in a while I need 'em on say, a Thursday night. This was the case a few days ago—and when the craving for oatmeal cookie pancakes struck at 6 o clock in the evening, I did not question it. I answered the call. 

My oatmeal cookie pancakes do not contain raisins. I repeat, they are not contaminated with raisins. In my world, raisins have no places in cookies or pancakes. These pancakes DO contain mini chocolate chips, however. Throw some in and you won't regret it!


Oatmeal Chocolate Chip Cookie Pancakes
Inspired by Joy the Baker
Makes 8-12 medium-sized pancakes
  • 2 eggs
  • 1 1/2 cups flour
  • heaping 1/2 cup old fashioned or quick oats
  • 3 tablespoons brown sugar
  • 2 teaspoons baking powder
  • 1 teaspoon baking soda
  • 1 teaspoon salt
  • 1 teaspoon ground cinnamon
  • pinch of freshly ground nutmeg
  • 2 cups buttermilk
  • 1 tablespoon honey
  • 4 tablespoons butter, melted and cooled
  • ¾ teaspoons vanilla extract
  • chocolate chips
  • cooking spray
In a large bowl beat eggs until frothy. Add buttermilk, butter, honey and vanilla and mix well.

Add flour, oats, sugar, baking powder, baking soda, cinnamon, nutmeg and salt. Mix well until mostly smooth. Fold in chocolate chips and let batter set for a few minutes.


Heat griddle or pan over low to medium heat. Splash a few drops of water in there and observe it. If it pops violently, it's too hot. If it barely does anything, crank the heat up a bit. If it sizzles, it's just right.

Pour 1/3 cup batter onto the griddle. Cook on the first side until tiny bubbles form on the top and pancake edges firm up a bit.


Flip the pancake over with a spatula and cook until golden brown. Repeat until all the batter is gone.


To keep your pancakes warm while the others cook, keep them on an oven proof plate in the oven set to 200 degrees. Serve with maple syrup and fresh fruit, if desired.


Other cravings of note have been for pizza! One of our favorite cheapo pizza joints around here is Cicis. We can stuff our bellies full of salad, pasta, pizza, cinnamon rolls and brownies for under 10 bucks for the both of us. We both have our favorites—mine is deep dish cheesy breadsticks and Gradon's is pepperoni, sausage and jalapeno deep dish pizza. We love that place so dang much.


Gradon and I hit the Charlottesville City Market this weekend for the first time. What we found was a bustling little community of plant, food and craft lovers alike. Everything from jewelry stands to bakery booths to taco tents. We picked up a beautiful basil plant to avoid having to shell out 2 bucks every time I make italian food. The thing was huge! Here is Gradon's labor of love planting it. He's already watered it twice today. He was so cute grilling the farmer at the market about where exactly he should trim the leaves and even verifying what he learned on the internet later.

A couple of months ago, we planted a few little flowers and hung a basket from our porch. We've really taken to the little guys and are enjoying watching them grow. We're so lucky to have a yard that we can make our own, even while renting an apartment. It really makes it feel more like home!


Thursday, June 21, 2012

Low Fat Baked Ziti with Spinach

Baked ziti reminds me of my dad. It's his dish of choice at most every italian restaurant. My mom makes an incredible baked ziti that confounds all others. However, this recipe is pretty dang great for how quick and light it is!

It sneaks a pretty hefty portion of spinach in there which will always make you feel better about eating a fair amount of pasta. It's not exactly swimming in sauce, so if your guests love extra sauce, do not deprive them, go ahead and double your crushed tomatoes. (My dad lovesss his sauce but I made this for Grades so I stuck with the original recipe) Don't forget to thaw your spinach and then squeeze it dry like your life depends on it. Otherwise you'll have watery ziti, and that would be a travesty!


Low Fat Baked Ziti with Spinach
Adapted from SkinnyTaste

Serves 8

Calories: 332
Fat: 7.1 g
Carbs: 55
Fiber: 7.8
Protein: 17.5

Ingredients:
  • 28 oz crushed tomatoes (I prefer Tuttorosso)
  • 1 tsp olive oil
  • 3 cloves garlic,minced
  • 10 oz frozen spinach, thawed and squeeze dry
  • 1 tsp oregano
  • 2 tbsp chopped fresh basil
  • salt and fresh pepper to taste
  • 8 oz fat-free ricotta
  • 1/4 cup Parmesan
  • Block of (8 oz) part skim mozzarella, shredded (grate your own cheese please!)
  • Cooking spray
  • 1 lb high fiber ziti such as Ronzoni Smart Taste (I like half whole wheat, half Ronzini Smart Taste)
Add sauce to the pot where your pasta has been waiting patiently. Add half of the shredded mozzarella to the pot, as well as all of the Parmesan cheese and ricotta. Give it a good mix and then transfer it to the baking pan, spreading evenly. Top with the remaining mozzarella.

Pop it in the oven and bake for 30 minutes or until mozzarella is melted and the edges are slightly browned.

Tip: you can make this the day before if you store it, tightly covered with foil, in the refrigerator. Just let it sit at room temp for 30 minutes before baking.

In honor of Father's Day this past weekend, here are a few goofy pictures of me and my dad. Sure I have a bunch of polished pictures of us at my wedding where we're all dressed up or at the beach with our sun kissed skin, but these photos represent my dad in his true, everyday form. It reminds me of the many nights that we stayed up late in our pajamas, eating bowls of cereal or ice cream and just talking about life.

We took these pictures on my mac the very first time I took it out of the package. My dad bought it for me as a college graduation present, and we could hardly wait to open it up and see what it could do. One of the first features we discovered was Photo Booth, and well, I guess you can tell that we had a little fun with it.