Thursday, February 16, 2012

Chocolate Waffles with Strawberry Sauce

These waffles were wonderful. Do you know why? Because they taste like waffles. But not like a regular waffle. Like a chocolate waffle.

Am I stating the obvious here?

I have just been jaded by a few recipes in the past that have claimed to be chocolate waffles and turned out badly. I've had one or two that tasted like watered down cocoa powder and others that could not be differentiated from chocolate cake. Ok, so the cake like one wasn't bad, it just didn't quite feel like breakfast.

But these really do. They're awesome! They have just the right amount of chocolate flavor with little bursts of chocolate chips in every bite. And they maintain the texture of a classic waffle.

Plus the slightly tart strawberry sauce pairs beautifully with the sweetness of the chocolate.

I thought they were perfect for Valentine's day, but they could easily be a special birthday treat. Or you could serve them in wedges for dessert! 
Chocolate Waffles with Strawberry Sauce
Adapted from Our Best Bites

Ingredients:
  • 2/3 C flour
  • 2/3 C corn starch
  • ¼ C unsweetened cocoa powder
  • ½ t baking powder
  • ½ t baking soda
  • ¼ t salt
  • 1/8 t cinnamon
  • 6 T sugar
  • 1 C milk
  • 1/3 C vegetable or canola oil
  • 1 egg
  • 2 tsp vanilla
  • ½ cup (or more) chocolate chips
  • 2-3 cups strawberries, sliced
  • ½ cup strawberry jam
  • 2 T hot water
  • powdered sugar (to taste)

    Start with your strawberry sauce. Combine jam and warm water and whisk until smooth. Add in your sliced berries and smash a few with a fork. Add a little powdered sugar for sweetness if you'd like. Set aside.


    Preheat and grease your waffle iron. (If needed) Combine flour, corn starch, cocoa powder, salt, baking powder baking soda and cinnamon. Whisk to combine. 

In another bowl, whisk together sugar, milk, oil, egg and vanilla until frothy. (About a minute)


Slowly add the wet ingredients to the dry, whisking to combine. Do not over stir. Note that the batter will be thin.

Add chocolate chips and give it a good stir before you ladle it into the iron. (It's better to ladle than to pour because you can scoop up those precious chocolate chips! Otherwise they get lost in the bottom of the bowl and never get to fulfill the measure of their creation. And that would be tragic.)

Cook until your waffle iron says so. Be careful not to burn, as you won't be able to tell so much with the dark waffles! Pay attention to texture instead. 

Top with some powdered sugar and your gorgeous strawberry sauce.


Hope everyone had a lovely Valentine's Day. Here are a few snippets of our week of love...

Sunday, February 5, 2012

The Bread

Out of respect for Pioneer Woman, who first introduced me to this wonder, I have retained her original name for it “The Bread.”

It is so hearty, flavorful and delicious, your guests will never believe that it requires exactly two ingredients. Bread and butter. Are you excited yet?

The secret to this amazing bread is the process. Oh, and the obscene amount of butter.

Please don't be afraid of the butter—it's good for you. And if it makes you feel better, I did cut down the amount of butter a wee bit from PW's original recipe. Just because I made it both ways and couldn't tell the difference. And butter is expensive!


The Bread
Adapted from Pioneer Woman
Ingredients:
  • 1 ½ sticks salted butter, softened
  • Good quality thick loaf of french or sourdough bread
To start, get your hands on a nice and thick loaf of french or sourdough bread. Leave a stick and a half of butter out on your counter to soften. If you forget, you can stick it in the microwave for a few seconds, keeping it in the wrapper and turning it ¼ turn until adequately soft.


Slice your loaf in half with a serrated bread knife and coat both underbellies completely with softened butter. Be sure to cover every crumb of it, extending all of the way to the edges.


Place your bread in a 350 degree oven for 10 minutes, just long enough to melt the butter. Then crank on that broiler.

Now I know that many have fears of the broiler and for good reason. It can be deadly if you walk away for too long! And that is why you must watch it after every minute. This bread will need a minimum of three minutes under the broiler. But you may need 5 or 6. You want to see little burn marks around the edges. I know that's hard to get—burnt is bad, right? Especially for me—I'm the biggest fan of doughy bread. But trust me on this. This step is essential for the magical flavor that this bread offers. It's what makes it “The Bread.”


The flavor and texture is so fabulous, it's hard to explain. The butter soaks deep into the doughy crevices and just does something insane. Everyone will ask you what you did to season it. No one will believe that it's just butter!

When it's done, remove it from the oven and immediately cut into strips. This bread must be served warm for the full effect.

Serve this with pasta, chicken or whatever you'd like. It's very versatile. It has totally become my go-to bread in a time crunch. Although it's certainly worthy of a special occasion. 
Enjoy it! 

Monday, January 23, 2012

Cheesy Tortellini Spinach Bacon Bake

In my house growing up, it was a tradition to have pasta on Sundays. My mom is Italian and I think she always saw it as a relaxing alternative to some of the more labor intensive meals that she cooked.

Consequently I've had a lot of tortellini in my life. The kind dredged in marinara sauce and topped with a little sprinkling of parmesan cheese. And I totally loved it—and still do. But when I came across this fresh take on the cute little pasta purses that I thought I knew so well, I had to try it. And once I did, I was sold! I have made it several times for company and it has made its way into the regular dinner rotation at the Nielsen house!

It really is such an interesting combination—spinach, bacon, pasta and a lemony cream sauce. Do not fear the lemon, you only end up tasting a hint of it. And that hint is marvelous.

I love that this dish makes a creamy and amazing sauce without having to rely on jarred Alfredo sauce. (Yuck. I haven't found one that I liked yet.)

To make this, you will need tortellini. I prefer the cheese—and even better if it has some spinach or other goodies mixed in! It's definitely in your local grocery store, either shelved or frozen. You will need about 12 ounces of it.

Cheesy Tortellini Bacon Bake
Adapted from Our Best Bites
Serves: 4-6
Ingredients:
  • 12 ounce bag cheese tortellini
  • 4-8 strips bacon
  • 3 cloves garlic (pressed or finely minced)
  • 2 TBSP flour
  • 2 Cups milk (can be skim)
    ¾ tsp salt
  • 1/8 tsp pepper (freshly ground if you have it)
  • 1 ½ tsp dry basil
  • ¼- ¼ tsp red pepper flakes
  • 1 medium lemon
  • 2 Cups loosely packed fresh spinach, roughly chopped
  • 1 Cup grated part-skim mozzarella cheese, divided (please no pre-shredded bags!)
  • ¾ Cup grated parmesan cheese, divided
Preheat your oven to 350 degrees. Start by filling a large stock pot with water, throwing in a little salt and bringing it to a boil. Cook the tortellini according to the package instructions. This is also a great time to grate your mozzarella cheese.


Cook your bacon in a medium skillet over medium-high heat. You want it pretty crisp. Remove bacon from pan and place on paper towels to drain. Resist the impulse to discard the grease! You need it to make your creamy delicious sauce. 


Ok, you can discard some of it. But make sure that you leave about 2 or 3 tablespoons in the pan. Turn your heat down to low to medium at this point. You don't want to burn your teeny weeny garlic pieces because it will create a very unpleasant taste in your sauce. That said, don't be alarmed if your garlic gets brown—you just don't want to burn it to a crisp.

As a side note, today was the first day I used my new garlic press and I think i'm in love. So much less torturous than mincing. I despise mincing. Mine was $3 at Ikea and well worth it.

Moving on, saute your garlic until tender and fragrant, about 1 minute. Add your flour and whisk about a minute. Your mixture will look gummy and weird. Slowly add milk and whisk constantly until smooth. Then throw in your spices—the basil, salt, pepper and red pepper flakes. It should start looking smooth and beautiful at this point. Bring your sauce to a simmer.

While you're waiting for the simmering to begin, grab your bright, beautiful lemon and use a microplane grater or a small cheese grater to zest it. If you haven't zested much in your life, I highly recommend it. This step cannot be skipped! Add two teaspoons of zest and one tablespoon of lemon juice to the sauce. Stir it until thickened, about three minutes. Remove the sauce from heat. 
Your tortellini should be cooked by now. Drain it in a colander and place it back in the pot. Crumbled your bacon and place in the pot with the pasta, reserving 1 strip for later. Add spinach, ½ cup mozzarella and ½ cup parmesan.


I forgot to mention to please please buy the mozzarella in block form and grate it yourself. It's usually the same price, if not cheaper and tastes so much better. Freshly grated mozzarella is in large part what puts the magic in this dish.

Add your sauce and gently stir to combine. Pour pasta mixture into approximately 9 x 9 baking dish and top with remaining cheese and crumbled bacon.


Cover pan with foil and bake for 20 minutes. Then remove foil and bake an additional 5-10 minutes, until cheese is melted and gooey looking and pasta is bubbling throughout. Serve with crusty garlic bread for a memorable meal!


Monday, January 16, 2012

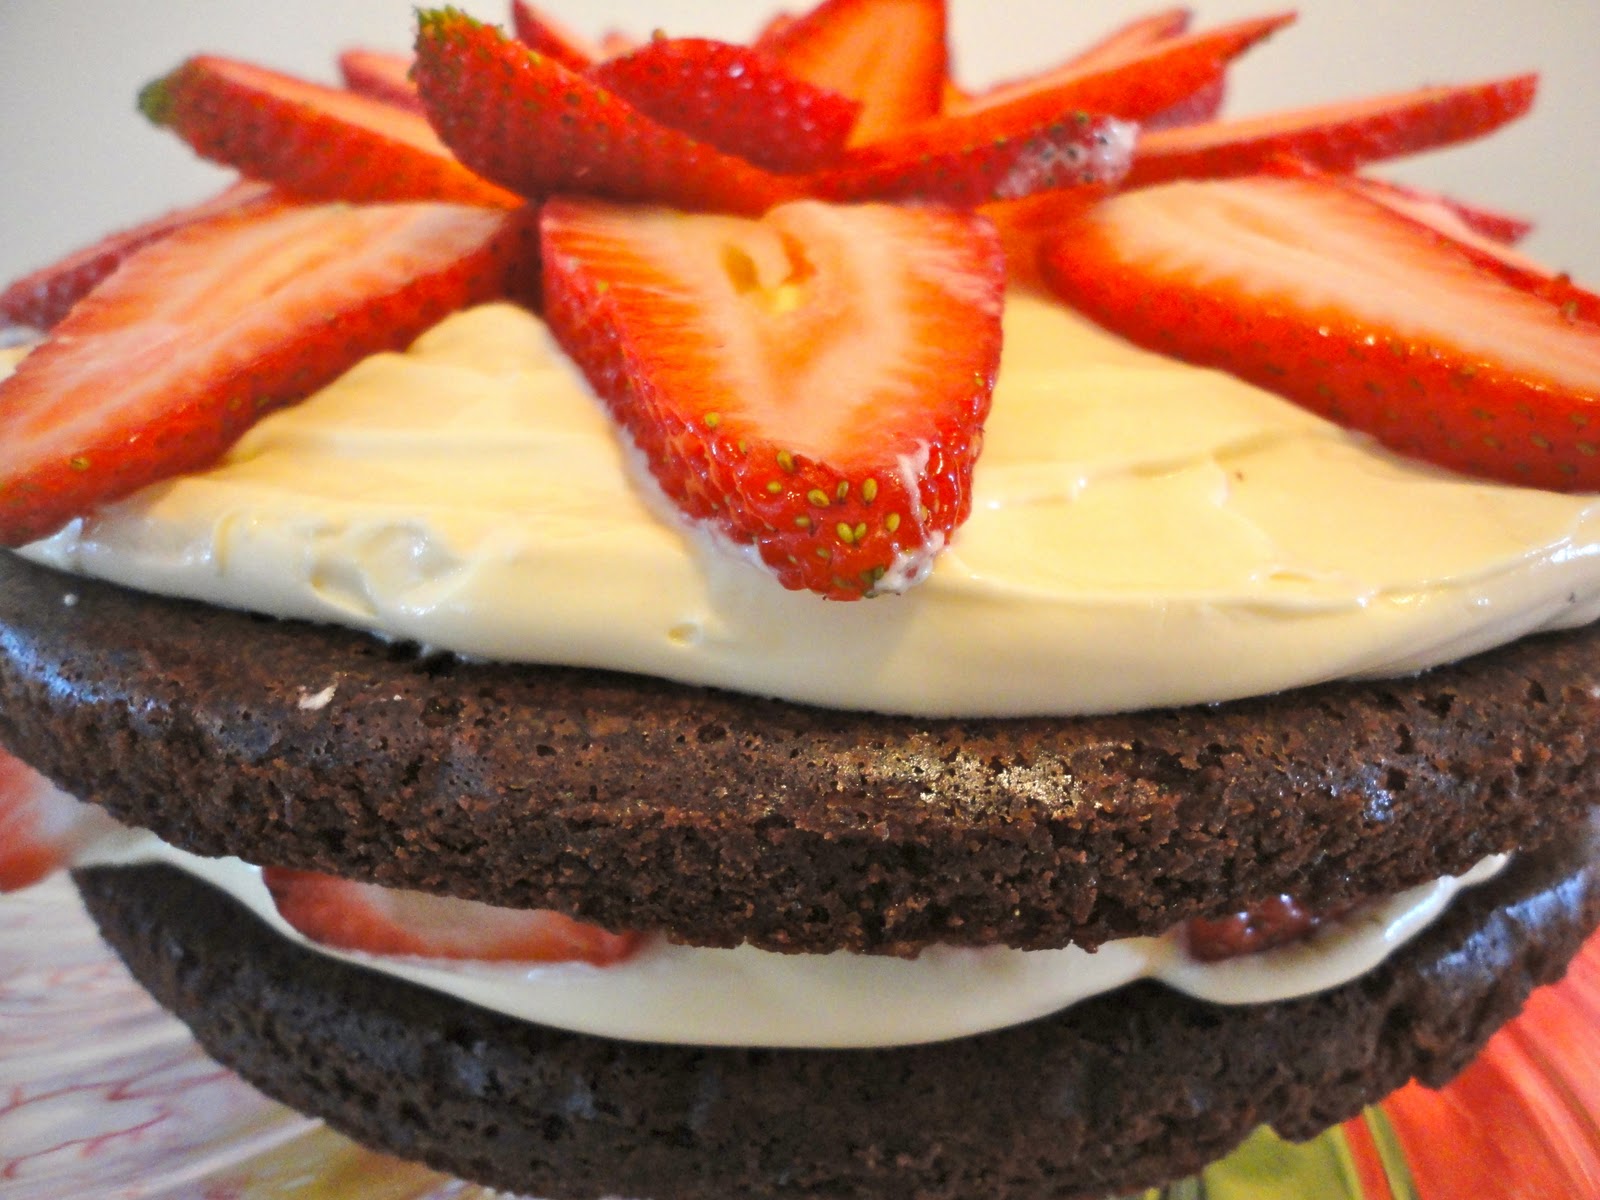
Strawberry-Stuffed Brownie Torte

A few days ago my husband informed me that he was getting more like me.

“In what way?” I asked. He said that his approach to holidays used to be very simple. He would pretty much wake up and go about his day as usual until something reminded him that it was a holiday. From there he continued to go about his day as usual unless someone invited him to a party or something. But nowadays, when one holiday ends, in this case Christmas and New Year's, he immediately starts bracing himself for the next. (This is his way of telling me he's aware that Valentine's day is coming up)

Truth be told I have been planning for Valentine's day since January 2nd. It always sneaks up on you I tell you! So to prevent that I am supplying you with the perfect Valentine's recipe for you to make for your sweetie this year so you won't have to be surfing the web frantically the day before the big day.

It's delicious and utterly adorable. Oh and man approved. Pretty much every man I know loves strawberries and pudding. I don't know what it is about pudding but it is manly. Women will always want to spruce pudding-like dishes up and call it mousse. But the men won't have it. They just want their pudding. At least that's what my dad has always said.

And thus I present to you the Strawberry-Stuffed Brownie Torte. 

This isn't the kind of thing you see floating all around the blogosphere. It's original and I promise that if you present this to your special someone on Valentine's day or any other day for that matter, he or she will feel the love.

Strawberry-Stuffed Brownie Torte
Serves: 8 (generous slices)

Ingredients:
  • 1 (21-24 ounce) high quality box brownie mix
  • Water, vegetable oil and egg(s) as directed on box1/3 cup water*
  • 1 (14 ounce) can sweetened condensed milk
  • 1/2 cup cold water
  • 1 (3.4 ounce) package instant vanilla pudding mix
  • 4 ounces whipped cream (homemade or Cool Whip work)
  • 1 quart fresh strawberries, hulled and sliced
Before I begin, please double check that you purchase a brownie mix that its 21-24 ounces. Also be sure that it's a high quality non-generic brand—one with some extra pizzaz like chocolate chips, syrup etc. I chose Betty Crocker Triple Chunk. It really does make a big difference in this recipe. 


Preheat oven to 350 degrees. Grease two 9-inch round cake pans. Line bottom of pans with circles of wax paper. Grease wax paper.


In a large bowl, mix together the brownie mix, vegetable oil, water and egg(s) as directed by the brownie mix box. Then take your brownie mix and note the warning on the back side.


Then continue eating the raw batter. :) I think I was permanently scarred as a child by watching Rocky drink raw eggs for breakfast. I figured if Rocky did it, it couldn't be bad! And to this day eating raw brownie batter is one of the great joys of my life.


Divide batter evenly into the two pans and bake for 15-20 minutes, or until toothpick comes out clean. Watch them closely, you don't want them to get too dry. Cool completely in the pan on cooling racks.
In another large bowl, mix sweetened condensed milk and 1/2 cup cold water. Beat in pudding mix with whisk. Transfer bowl to the refrigerator and chill for 5 minutes. Remove from fridge and gently fold in whipped cream. Peel wax paper off of brownies. Place one brownie layer on a serving plate. Top with half of the pudding mixture, followed by half of the sliced strawberries.


Add the second brownie layer and repeat, arranging strawberries prettily on top! Keep refrigerated until ready to serve.